Evernote for CPAs: Developing a Super Power
By Charles Hall | Technology
There is no Evernote just for CPAs; even so, it’s a game-changer for beancounters. I’ve used this tool for about twenty years and it is one of my favorites software packages. In this article I tell you what Evernote is, how you can use it, how to feed information into it, and how to search it using Evernote operators.
So, what is Evernote?
What is Evernote?
Think of it as your digital library.
Evernote is a cloud-based storage system that allows you to capture and file voice recordings, documents (including Word, Excel, PDFs), pictures, and videos. Once information is placed in Evernote, it is searchable in a Google-like fashion. Even hand-written notes are searchable.
What can CPAs do with this app?
Things CPAs Can Do with Evernote
Here are examples of what you can do with Evernote:
- Create a personal digital library (e.g., use an Evernote notebook to store research information, Journal of Accountancy articles, CPE material, videos of class instruction)
- Share individual files or notebooks (a compilation of files) with others
- Capture meeting conversations with your smartphone and save them to Evernote
- Use your smartphone to take a picture of meeting notes on a whiteboard (remember manually written words are searchable)
- Encrypt selected text within an Evernote note (password protected); the encrypted information can’t be viewed without the password
- Add selected web information to Evernote using an Evernote clipper
- Forward any email to your Evernote account using your private Evernote email address
So, what are the main components of an Evernote storage system?
The Skeletal Framework: Notes, Notebooks, and Tags
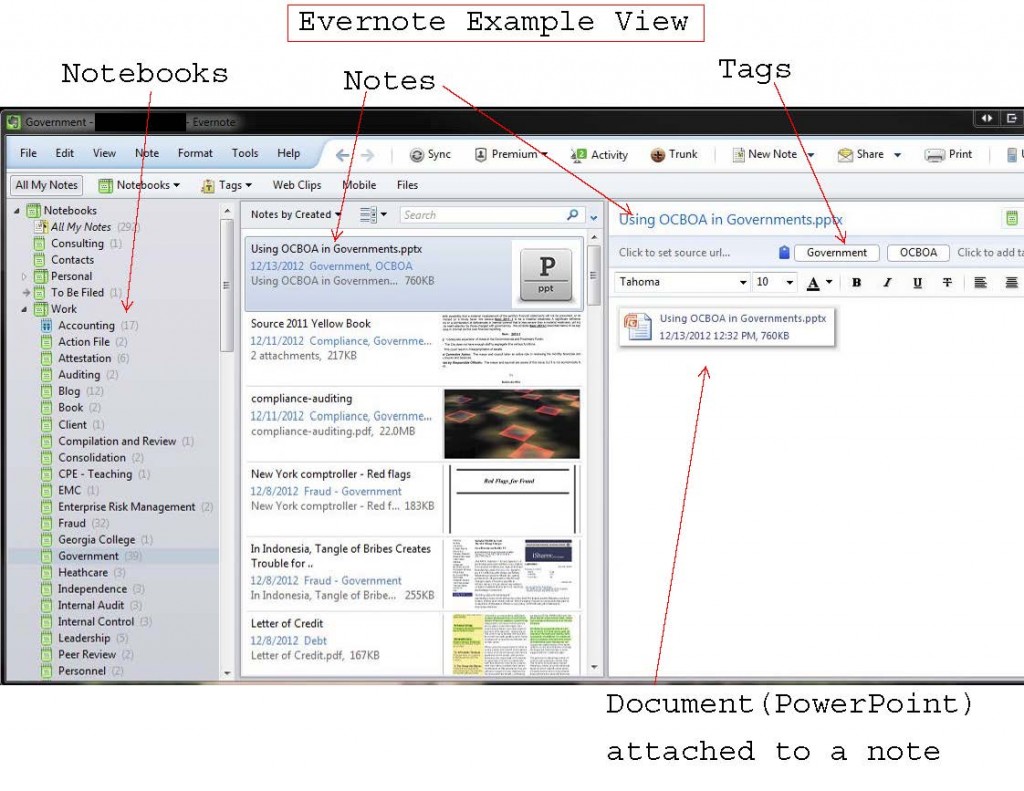
The skeletal framework for Evernote has three elements: Notes, notebooks, and tags.
1. The primary element of Evernote is a note.
Think of a note as a blank piece of paper on which you can type. You can also attach other files to the note (e.g., an Excel spreadsheet or a picture taken with your cell phone or a voice message recorded with your cell phone or a note you’ve jotted down). Once you create your notes, organize them in notebooks.
2. Notes are placed in notebooks.
Think of a notebook as a three-ring binder.
For example, if I want to create a note about comprehensive income, I can do so. Then I can attach related files (e.g., PDFs) to the note. Next, I might add a note about other comprehensive income and another about reclassifications from other comprehensive income. The separate notes can, for example, be a text file, an Excel file, and a voice message.
All three notes can be added to a notebook titled Comprehensive Income.
Another way to organize your information is to tag each note.
3. You may also tag each note.
I could place the comprehensive income notes in a notebook titled accounting (a more generic category) and tag each note as comprehensive income. Then I can search and find all comprehensive income notes by using the comprehensive income tag. When I type tag:”comprehensive income” in the Evernote search bar, all notes tagged in this manner appear. (See below for information about operators such as tags.)
Use both folders and tags to help you more readily find information.
And how do you put information into Evernote?
Getting Information Into Evernote
First Set Up Your Default Evernote Notebook
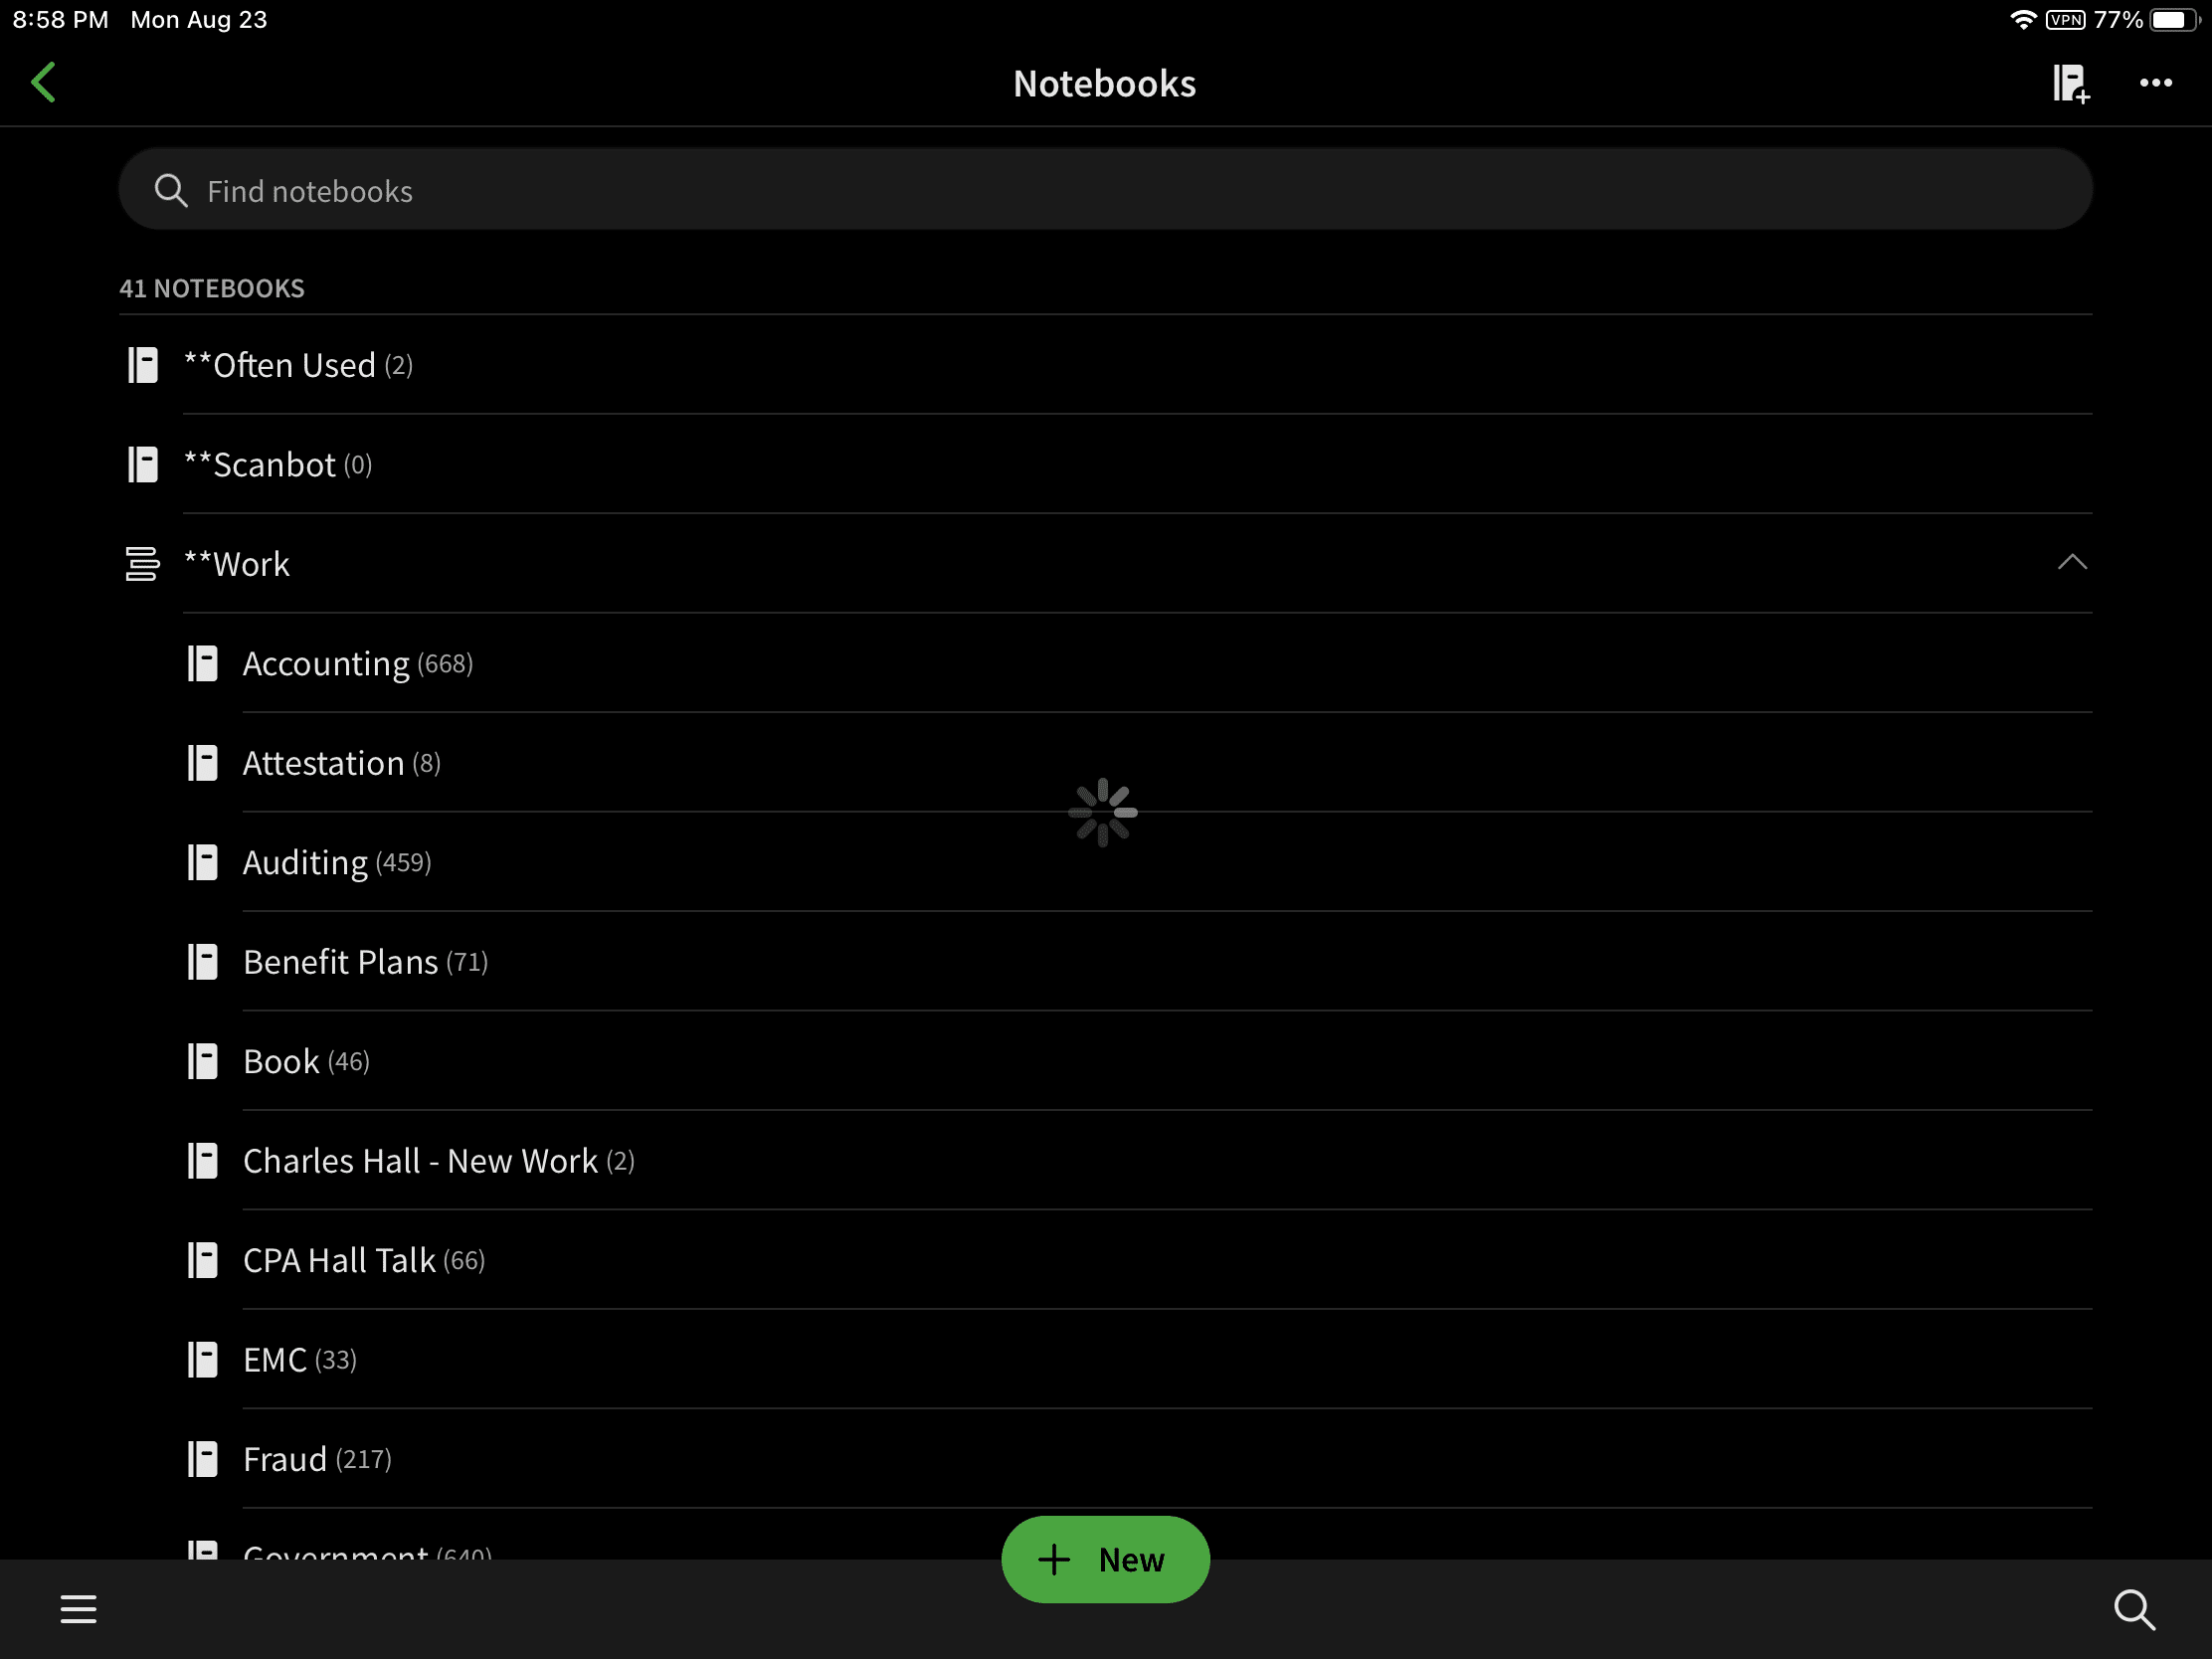
Before sending information from one of your devices (e.g., smartphone) to Evernote, specify where it should go. My default landing area is my Often Used notebook. (You will need to create the Often Used notebook—or whatever you’d like to call it—in your Evernote account.)
Since I send information from a variety of devices, I initially send information to the Often Used notebook; later, when I have time, I tag each note (e.g., Fair Value) and then move each to an appropriate notebook (e.g., Accounting).
Tip – If you put asterisks in front of the folder name (e.g., **Often Used), Evernote will present it (the folder) at the top of your folder list. This will make it easier to locate your default folder.
Here’s a screenshot of Evernote from my iPad.
In short, my standard operating procedure: (1) capture on the fly and (2) classify with a block of time (it usually takes me less than five minutes each day to tag and move the new notes).
Seven Ways to Feed Evernote
1. Smart Phones
You can use your smartphone to create and send pictures, text files, and voice messages to Evernote.
To download Evernote for an Android phone, click here.
iPhone users should download the Evernote app.
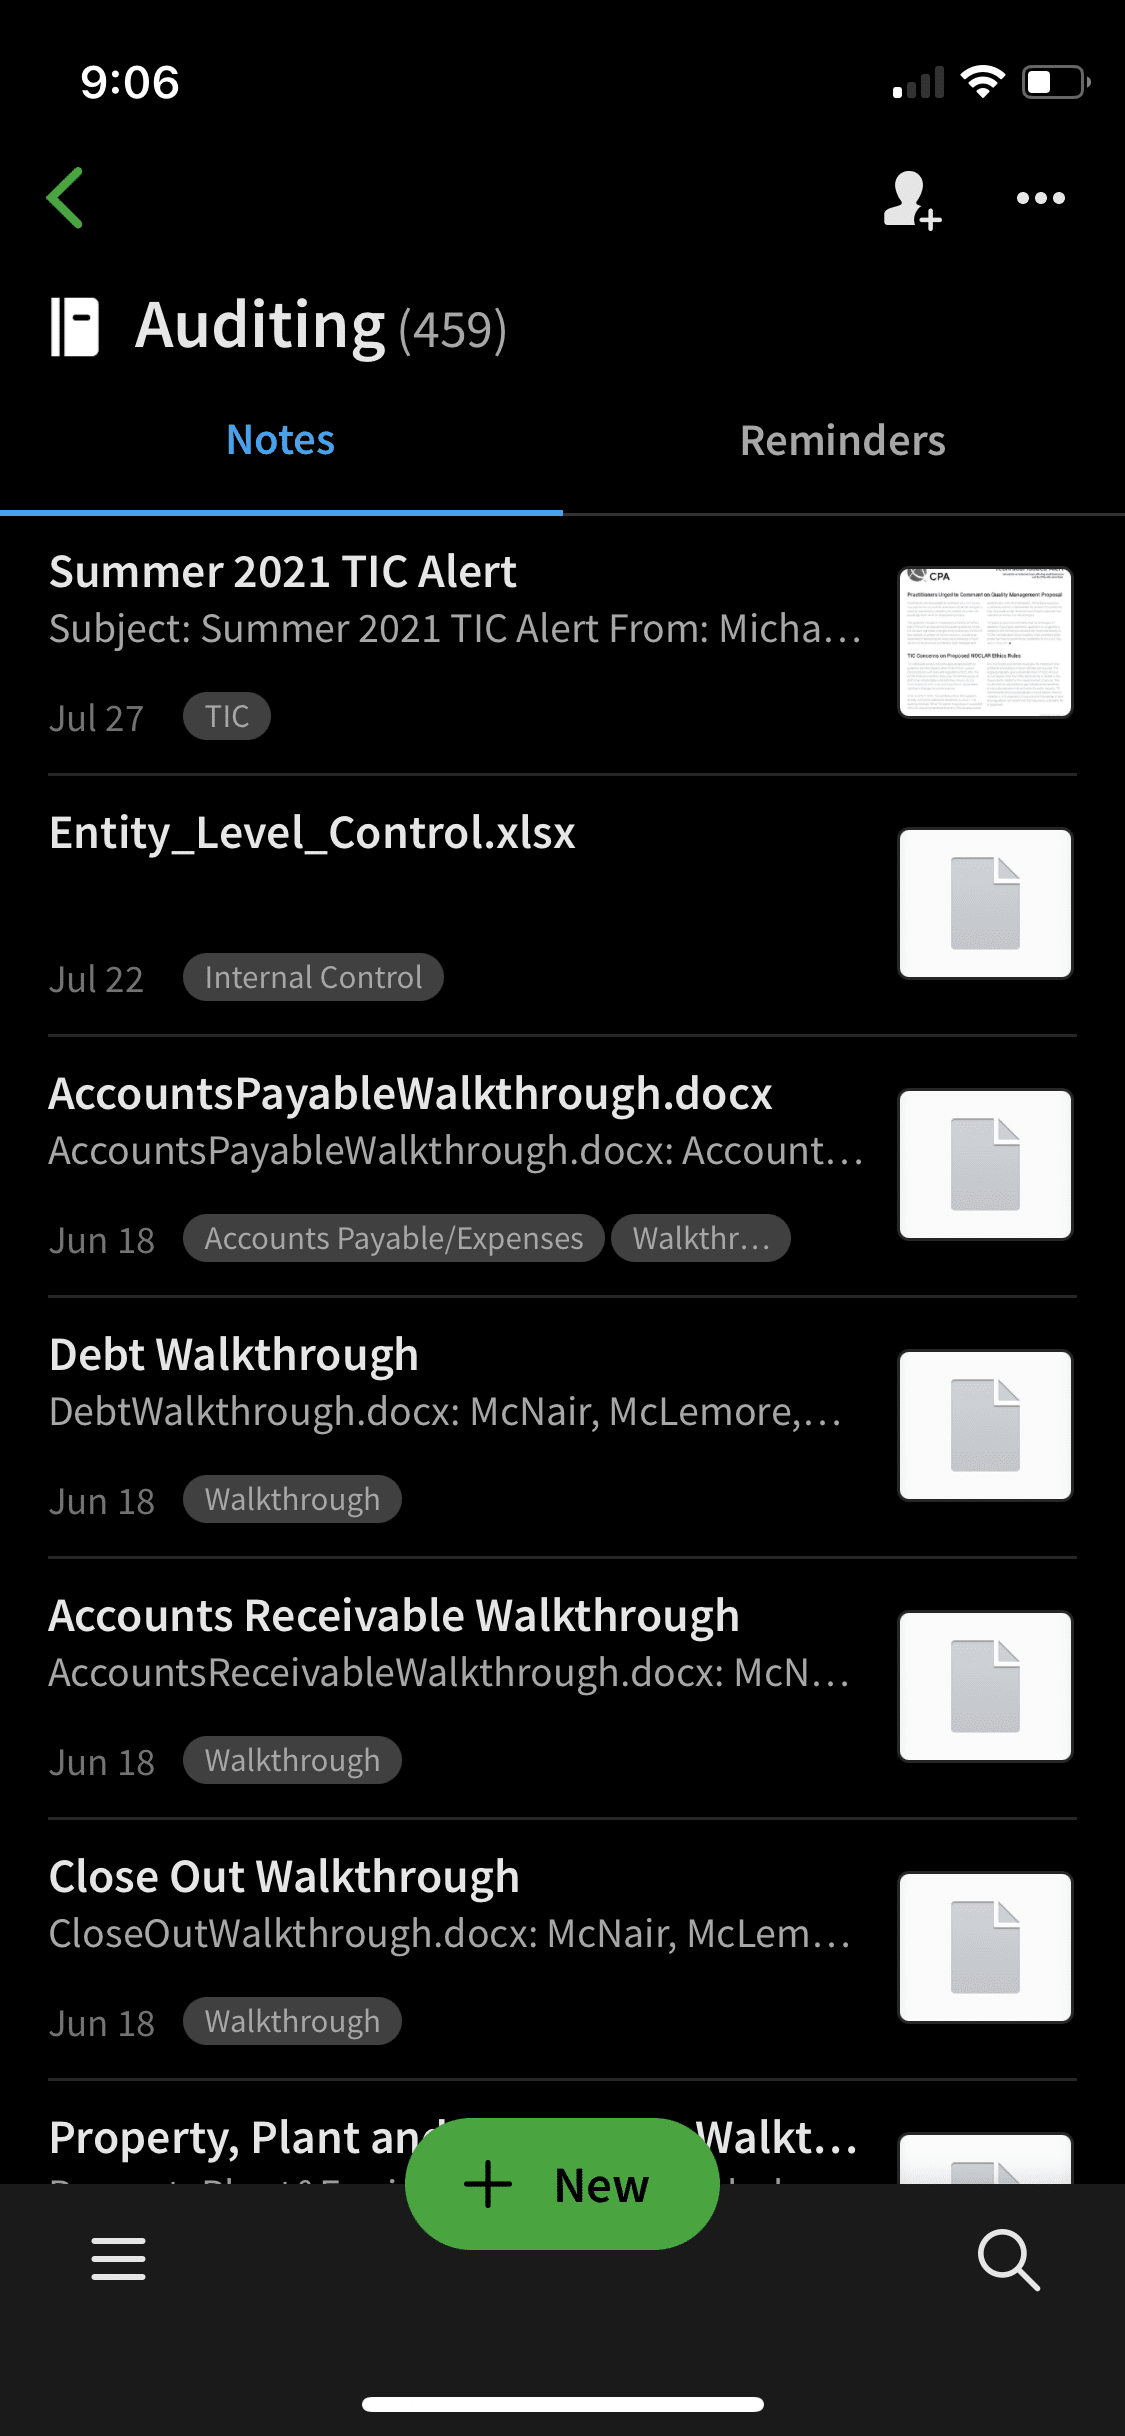
Here’s a screenshot of my iPhone Evernote app. Notice the note names at the top of each note and the tags (in the oval shapes) at the bottom of each note.
2. Scanners
I use a Fujitsu scanner (model iX500) to scan documents directly to Evernote. (The iX500 costs about $780 from Amazon.)
3. Web Clippers
Evernote provides web clippers for browsers including Safari, Explorer, Google Chrome, and Firefox. If you click this web clipper link, Evernote will automatically recognize your browser; then you can download the clipper software to your browser. While browsing, click the Elephant icon to clip a portion of the web page, the full page, or the full article.
4. Hotkeys
Evernote allows you to use hotkeys to capture information from any program (as long as Evernote is running in the background). To activate screen clipping, use the key combination (e.g., for Windows: Win+PrintScreen). See Preferences to change your hotkeys.
So if you are working on an Excel spreadsheet, for example, and would like to capture the information into Evernote, use the hotkey combination and select the portion of the screen you wish to save. The screenshot will go to your default Evernote location.
You can do the same with an email, a Word document, and anything else that appears on your screen.
5. Email Directly to Evernote Account
One of my favorite ways to feed Evernote is to email a document (e.g., Excel, Word, PDF) directly to Evernote; when you set up your Evernote account, you will be provided a private Evernote email address. Set this address up in your email contact list; then you can send any email or document (attached to an email) to your Evernote default notebook.
6. Drag and Drop
With Evernote open, you can create a new note and then drag a document (e.g., Word or Excel file) onto the open note. The material is added to the note. You can add multiple documents to one note.
7. Import Folder
An even easier way to get files into Evernote is to use an “import folder.” After you specify in Evernote where the “import folder” is located on your computer (i.e., a particular Windows folder), you can drop files into the designated folder, and they will automatically feed into your default Evernote notebook.
Searching Your Evernote Account
Once you’ve used Evernote for some time, you’ll have several thousand notes, so many it can be difficult to find the information you’ve stored. That’s when operators can help. Use these to locate the notes you are looking for.
Evernote Operators
You can use Evernote operators in the search box to locate particular information. Some of the more commonly used operators are:
1. And
2. Any
3. Tag
4. Notebook
5. Intitle
6. Created
And – Normally you will not type the word “and” as an operator; it’s implied. So if you type: comprehensive income in the search box, Evernote will locate all notes with the words comprehensive and income. If you want to see all notes with the phrase “comprehensive income,” then type: “comprehensive income”–using quotation marks.
Any – Typing the words “any: compilation review” will provide all notes with either the word “compilation” or the word “review.” If a note has the word “compilation” (and not “review”), then it will appear in your search list. If a note has the word “review” (and not “compilation”), then it will also appear in the list.
Tag – By typing “tag:Bank” into the search box, you’re telling Evernote that you want to see all notes tagged “Bank.” (You can tag each note regardless of which notebook it is in; for example, you might have four different notes in four different notebooks, but each tagged “Bank.”)
Notebook – Let’s say you have a notebook titled: Auditing (along with 70 other notebooks). You can type: “notebook:Auditing” in the search box and Evernote will locate your auditing notebook.
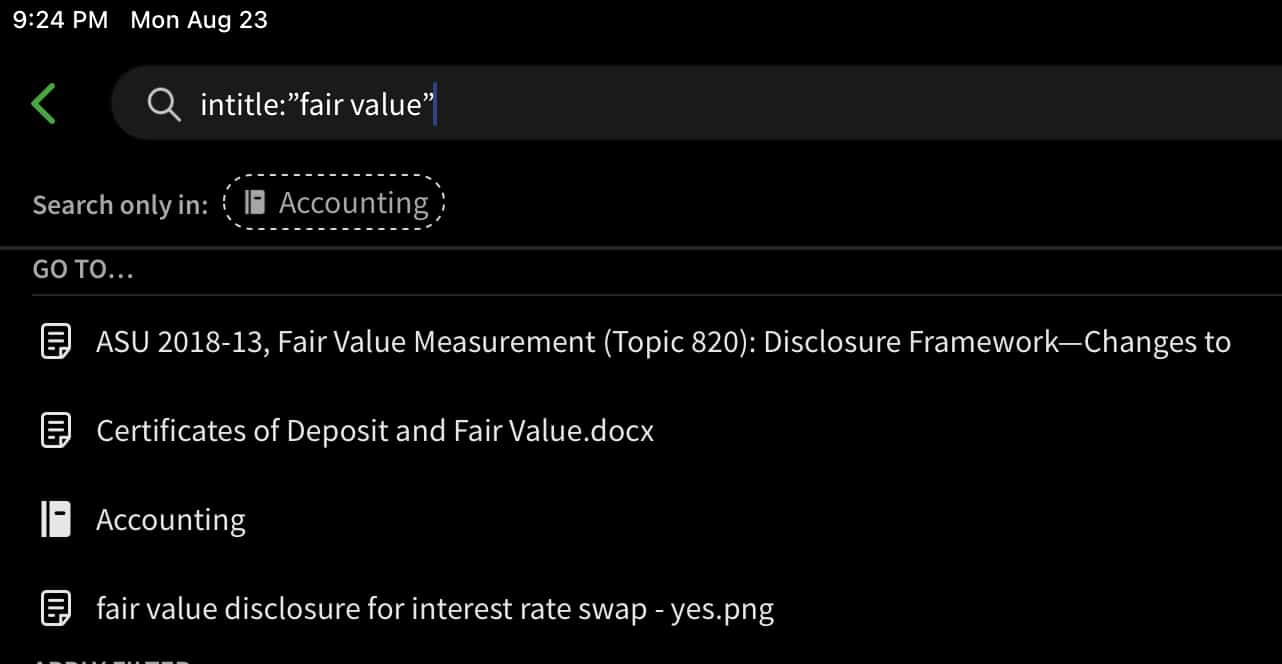
Intitle – Typing intitle:”fair value” will yield all notes with the words “fair value” in the title.
Created – “created:day-1” will provide you with a list of all notes created yesterday and today. You can substitute “day” with “week,” “month,” or “year”. If you want to see all the notes created in the last two weeks, issue a search with “created:week-1.”
Combining Evernote Operators
Searching becomes even more powerful when you combine operators.
For example, typing:
Intitle:derivative swap “cash flow hedge”
will provide you with all notes that have the word “derivative” in the title and the words (1) “swap” and (2) “cash flow hedge” as a phrase.
Another example, typing:
Notebook:Accounting any:swap “cash flow hedge”
will provide you with a list of all notes from your accounting notebook that have either the word “swap” or the words “cash flow hedge” as a phrase.
Finally, typing:
Notebook:Bank tag:Deposits FDIC “Due to Due from”
will provide you with notes from your Bank notebook that have a “Deposits” tag and that contain the words FDIC and “Due to Due from” as a phrase.
Create Your Evernote Account
To create your account, go to the Evernote website and follow the directions. There is a free version if you want to try it out. You can see a comparison of their plans here. I have not received any type of commission for this recommendation.
See my article An Auditor’s Cell Phone.

